The module one test is conducted on a purpose built patch of high friction tarmac, and involves a number of cone based exercises. It lasts about 20 minutes, and will be easy if you feel confident with your motorcycle handling.
The exercises
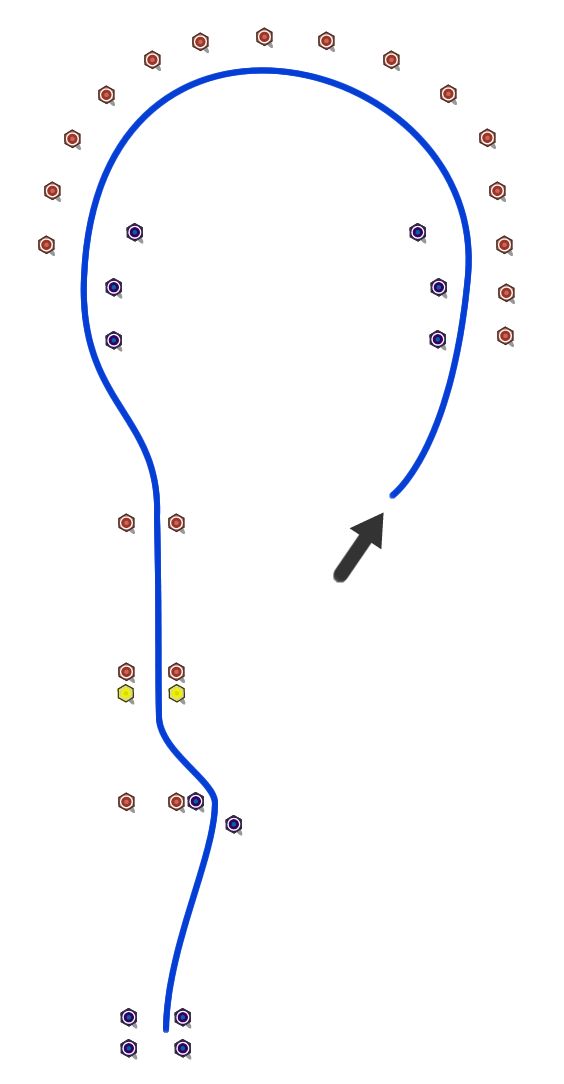
The course is laid out as shown below - please note that there can be a left or right hand orientation. In this article we'll focus on the 'left circuit' only, but be prepared for the corner to be in the opposite direction. This will look seriously confusing until it's broken up into distinct exercises, which we'll do below. Note that the colour of the cones is representative of what's used in the real test.
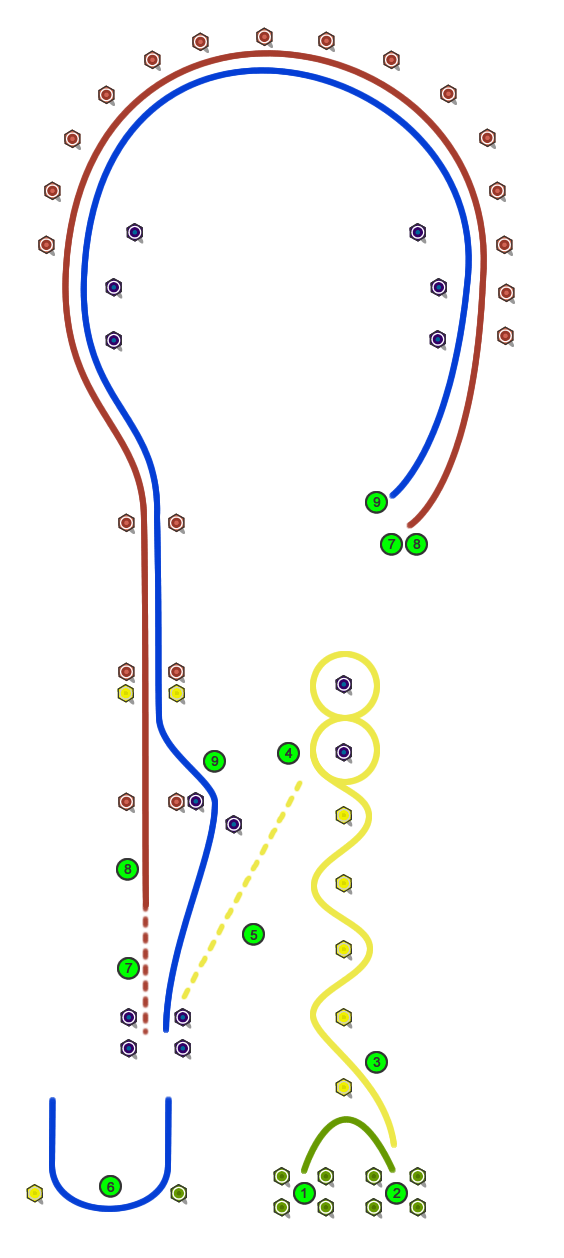
1 & 2. Wheeling the bike into a parking spot and using the stand
6. A U-turn
7. Cornering and stopping in a controlled way
8. Cornering (again) and emergency stop
9. Cornering and higher speed avoidance
The exercises that people tend to worry most about are the U-turn and the figure of eight, but with the right technique these are not as bad as they might seem. We'll go through the detail later in this article.
What to do with every exercise
- Good all round observations and mirror checks before pulling away (every time you have put a foot down)
- When stationary, hold the bike on the rear brake and put your left foot down on the ground
- Listen to the instructor, who will talk you through each exercise with the aid of a diagram
- Ask questions if you don't understand
1 & 2: Wheeling the bike into a parking spot and using the stand
The first exercise will be to get on your bike, fire it up, drive into the test area, then come to a stop to listen to the first instructions. Then you'll be asked to ride the bike into one of the parking bays front first as indicated by the green cones (1 in the diagram below) and put it on the stand and turn off the engine. Once you've done this, you'll be asked to wheel the bike into the second bay facing outwards (2).
We've found by far the easiest way to do this is to grab the handlebar and the grab rail and wheel the back straight back for about 8 to 10 paces whilst looking in the direction of travel. Then transfer both hands to the handlebars and walk in a U-shape until the bike is straight in line with the parking spot, then transfer one hand to the rear grab rails, walk it in and put on the stand. Congratulations, you're already well on the way to passing!

3 & 4. The slalom and figure of eight
The slalom takes off where the parking manoeuvre finished. You'll be asked to get back onto the bike, take it off the stand, start the engine and ride between the first and second yellow cones in a slalom. When you get to the blue cones, you'll need to continue to do a figure of eight until the instructor waves you over to where they are standing (this will be after two complete repetitions).
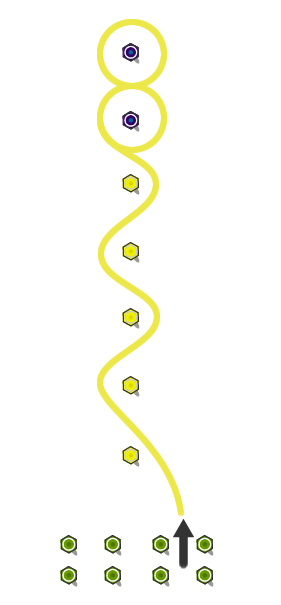
3. Slalom
Here are the tricks to be successful at the slalom:
- Take your time.
- Perform observation and mirror checks before pulling away.
- Once you have pulled away, do not put a foot down.
- Keep your knees locked against the fuel tank.
- Keep the engine ticking over and slip the clutch to control the speed. Gently dab the rear brake if needed to bring the speed down.
- Be as smooth as you can with all controls.
- Don't focus on the cones - instead look further off towards the horizon. This is a good trick to maintain your balance at lower speeds.
- If you feel the bike is going to fall at any time, use the throttle to pull the bike into a more upright positions.
4. Figure of eight
For the figure of eight, continue to use the techniques above and make sure you keep your head up and look in the direction you want the bike to go. This is especially important when you transition from left to right steering and vice versa.
5. Slow ride
The slow ride (the dotted yellow line below) is simply to get you from the end of the figure of eight to blue cones which signify the starting position of the U-turn.. For the slow ride you'll need to ride at walking pace as if moving in heavy traffic. The trick here is to look towards the horizon, keep your knees locked in, keep the revs up, slip the clutch and dab the rear brake if your speed starts to creep up. Stop the bike with the front wheel in the blue cone gate.
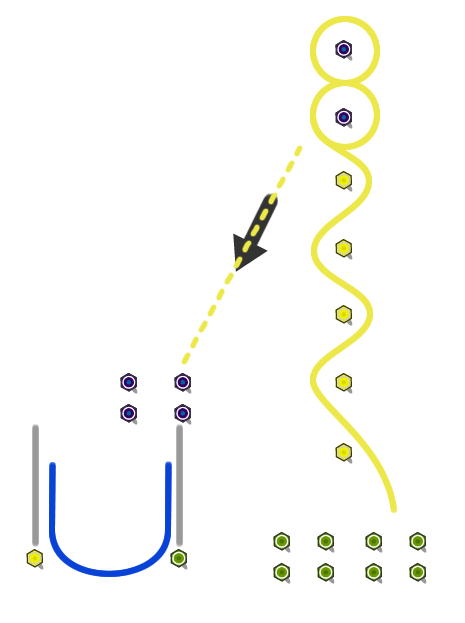
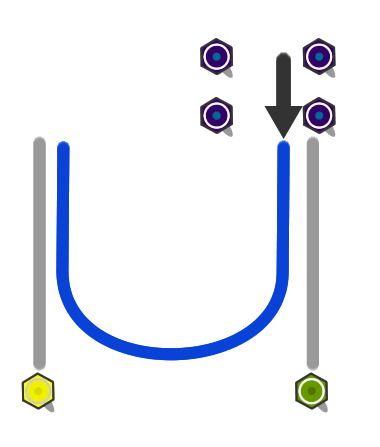
6. U-turn
Next is the U-turn. You need to make the turn between the two white lines marked on the tarmac. You'll start with the bike in the blue coned area. When told to do so, do mirror and observation checks and pull away slowly. Before you make the turn remember to do a lifesaver shoulder check. When making the turn, keep your head up and look in the direction you want to go. Once you have made the turn, bring the bike to a stop and put your foot down. The white lines are treated like the curb of the pavement so it doesn't matter if you put your foot down outside the white line.
The instructor will then ask you to follow them to the start position for the higher speed exercises.
7. Cornering and controlled stop
Remember, you're trying to demonstrate your higher speed control here so no need to be afraid of he throttle. From the starting position, accelerate the bike to a minimum of 19mph, probably using second gear. Head between the blue and red cones at the entrance to the corner, ride around, exit between the blue and red cones. Pass through all the gates, then bring the bike to a controlled stop in the blue box. When slowing down roll of the throttle gently, then use mainly the front brake to bring the bike to a nice gentle stop.
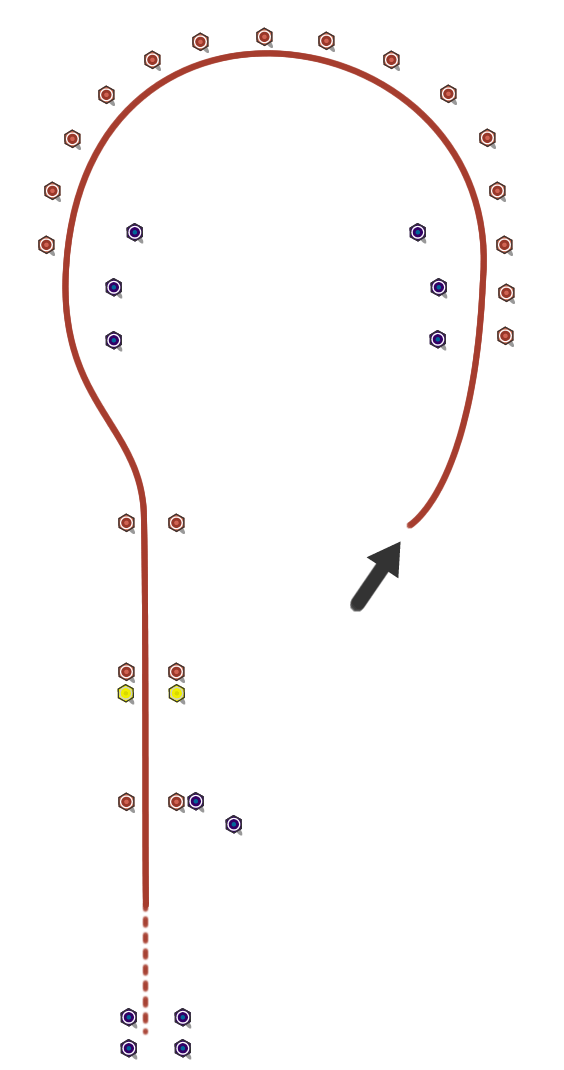
8. Cornering and emergency brake
For the next exercise, follow exactly the same route as above, but this time you need to be going at least 32mph when passing between the speed detector marked by the yellow cones. Once you have passed through the speed trap, the instructor will raise their hand to let you know to pull an emergency stop. When this happens, roll of the throttle quickly and apply the front and rear brakes progressively and firmly. Only pull in the clutch at the last minute before stopping. Don't worry about sorting your gears out when you're slowing down, and also don't worry if you stall the bike.
9. Cornering and higher speed avoidance
For the final exercise, you initially follow exactly the same route as the previous two exercises, and as with the emergency brake you need to pass through the speed trap at at least 32mph. As soon as you have passed through the yellow cones, roll off the throttle, and steer between the two blue cones. It might look tricky on the diagram, but in real life it is manageable. The amount you need to move the bike is only about 30cm to the left or right. The technique to use here is counter steering - essentially you need to steer the handlebars a small amount in the opposite direction to the direction of the turn and simultaneously move your body weight to get the bike to lean rapidly in the direction of the turn. If you don't already know how to do this - please talk to an instructor!
Good luck - you'll be fine!