Handbrake turn
Handbrake turns are frequently used in rally driving to negotiate tight, lower speed corners and can be useful in a variety of low speed maneuvers and stunts.
This method of turning tight corners relies on the fact that handbrake usually operate on the rear wheels, which lock when it’s pulled on hard. This allows a slide to be induced and a tighter radius or corner will be completed. Note that this method of taking a bend will only be quicker than the conventional racing line if the corner is very tight. Handbrake turns are also a method of inducing oversteer for drifting, and can be used in conjunction with the Scandinavian flick.
How to do a perfect handbrake turn
When practising handbrake turns, it’s best to use a low friction surface to make it easier for the back end to slide and to prolong the life of your tyres. Here’s an overview of the maneuver, which we’ve split into six stages (explained below).
Stage 1:
Approach the corner at a reasonably low speed (no more than 30mph is a good rule of thumb, when learning). Use first gear when you’re starting to learn, then try higher gears for complete mastery. Before you turn into the corner, swiftly come off the gas to create a forwards weight transfer and provide maximum grip at the front end – you’ll need this to allow a swift turn in.
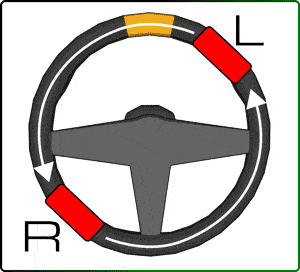
Position your hands in a way which allows you to take big bite of the steering wheel and turn in a single fluid motion. A suggested initial hand position to take a left hander and the direction of turn is shown below. If you’re in a left hand drive car, the right hand is optional and vice versa – you’ll need the other hand to operate the hand brake half way through the maneuvers. You’ll find it easier if the hand doing the steering is pulling the wheel rather than pushing it – but it is possible to do the turn in both directions with practice.
Stage 2:
Turn in hard in one fluid motion and aim to apex half way round the corner
Stage 3:
Simultaneously press the clutch and slam on the handbrake in a rapid and positive motion, ensuring you are holding down the release button to prevent the ratchet engaging – you’ll need to release it just a quickly.This will lock up the rear wheels and induce a slide and start to tighten up the radius of the corner.
Stage 4:
As the back of the car comes round, start to take off the steering lock you initially applied. You may need to let the wheel slip through your hand in a controlled way. You need to end up with the wheels pointing in the direction you want to go.
Stage 5:
This is the tricky bit – when the car has rotated to the desired amount, release the handbrake, knock into first gear if necessary, and bring out the clutch with enough revs to spin the wheels slightly. This will give you the best possible start in the new direction. Counter steer if necessary if you’ve overcooked the angle.
Stage 6:
Pull away using the same throttle technique as the perfect start.
When done correctly, stages 2 to 5 should only take between only two to three seconds – this is a rapid series of fluid motions. When learning this technique, it’s best to practice in a smooth wet grassy field with plenty of room.
Common mistakes:
- Approaching the corner too slow – this will prevent you from getting the required amount of rotation
- Approaching the corner too fast – this can result in an uncontrolled spin, or understeer preventing you from keeping the required line as you turn in
- Holding the handbrake on for too long – this will make the car rotate further than you wanted


I always wanted to learn this trick but with little success. There must be a recommended condition of the car like proper tire pressure, right momentum and good brake kit.